To achieve this effect, the first thing you must realize is that you cannot use the XNextEvent() routine as usual in your main event loop. This application requires redrawing the starfield every couple of milliseconds, which makes the XNextEvent() function (by itself) unacceptable, since it is a blocking routine. Putting it another way, the "typical" Xlib event loop alrorithm is:
1   while forever
2      wait for an event
3      process that event
4   endwhile
Placing the update-screen code immediately after line 3 will not work, since eventually the program will hang on line 2, and won't execute your update-screen code until a new event kicks it out of its waiting state. We need to perform screen updates on a regular basis, even if there are no events to process.
We change the algorithm slightly so that if there are no events to process on a given iteration, we go ahead and update our screen anyway. Only when there are events to process do we handle them as before.
1   while forever
2      while there are any events to process
3         get an event
4         process that event
5      endwhile
6      update screen
7   endwhile
Let's skip coding this new algorithm for now, and concentrate on the graphics portion of the code.
 4  #include <X11/cursorfont.h>
    ...
15    Cursor  trek;
      ...
38    trek = XCreateFontCursor( dsp, XC_trek );
39    XDefineCursor( dsp, win, trek );
Line 38 creates the cursor and Line 39 tells our window to use it.
There is a small problem, however. When viewing the cursor, it
appears as a black Enterprise surrounded by a white border. This
is the standard coloring scheme of all default cursors, but it is
not what we prefer for our application. Since we will be "flying"
our Enterprise cursor over a black starfield, we would much rather
have a white Enterprise surrounded by a black (and thereby "invisible")
border. To do this, we must use the XRecolorCursor() command.
   XColor  fg, bg;
   ...
   XParseColor( dsp, cmap, "white", &fg );
   XParseColor( dsp, cmap, "black", &bg );
   XRecolorCursor( dsp, trek, &fg, &bg );
These commands effectively reverse the standard coloring scheme, and give us an Enterprise cursor much better suited to our needs.
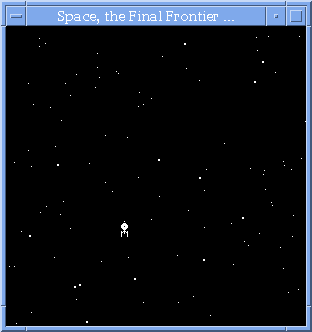
#define  NUMSTARS  100
struct STAR {
  int  x, y;   // the star's (x,y) position
  int  vel;    // velocity can be 1 through 5
  int  size;   // size can be SMALL=1 or LARGE=2
} stars[NUMSTARS];
A star's coordinates are stored in the (x,y) members. Velocity
is measured in pixels per iteration; that is, the number of pixels
a star will move between successive iterations within the event
loop. I decided that stars can move anywhere between 1 to 5 pixels
per iteration (where slow stars move 1 pixel at a time, and fast
stars move 5 pixels at a time). Once again, you may decide to use
different velocity values that suit your tastes. Lastly, I chose
to allow only two star sizes. Stars of size 1 are single pixels.
Stars of size 2 are filled circles with a diameter of 3.
Stars are initialized by being randomly placed throughout the window. They move down the screen at their respective velocities until they reach the bottom of the window. At that point, they reappear at the top of the window at a new random x-position, and continue their journey downwards again.
A better solution is to draw our new star pattern on an "offscreen" Pixmap, and once our new starfield is ready, we "blit" it onto our window all at once. This is analagous to those old style paper flip books, where each pre-drawn "frame" is shown briefly, one after the other, giving the illusion of motion.
We create a Pixmap in which to draw our starfield. Since our stars will all be drawn in the same color (white) on top of a black background, we can conserve server memory by creating our Pixmap with a depth of 1 (i.e. a Bitmap). We can then use the XCopyPlane() routine to copy our starfield Bitmap (of depth 1) into our viewing Window (usually of depth 8 or 24, in most cases).
   Pixmap  starPix;
   GC      pixGC;
   ...
   starPix = XCreatePixmap( dsp, win, 300, 300, 1 );
   pixGC = XCreateGC( dsp, starPix, 0, NULL );
   XSetForeground( dsp, pixGC, 0 );
   XFillRectangle( dsp, starPix, pixGC, 0, 0, 300, 300 );
We create our Pixmap and a corresponding GC. Note that the GC we create based on this Pixmap cannot be used for our Window as well, since the depths do not match. This is a common error that Xlib novices make, thinking that they can use the same GC for both the Bitmap and the Window. We will need to create another GC to be used with our Window. Lastly, newly created Pixmaps need to be cleared, since they will typically have garbage bits in them. Since we're dealing with a bitmap, we set our GC foreground to zero and do a big XFillRectangle() to clear our Pixmap.
   srand48( getpid() );
   for ( i = 0; i < NUMSTARS; i++ )
   {
      stars[i].x = (int)(300.0 * drand48());
      stars[i].y = (int)(300.0 * drand48());
      stars[i].vel = 1 + (int)(5.0 * drand48());
      stars[i].size = (drand48() < 0.9)?  SMALL : LARGE;
   }
I seed my RNG with the application's PID, so that each run will
generate different star patterns. Then, each star gets placed at
a random location within the window, with a random velocity and
a random size. I skew my star size by making only one tenth of them
of the "large" variety.
Now, for each iteration through my event loop, I need to move all the stars by their proper velocity and redisplay the new starfield. First, I clear the "scratch" Pixmap again. Then, for each star, I update its position and draw it. When all the stars have been redrawn, I'm ready to update the Window.
   XSetForeground( dsp, pixGC, 0 );
   XFillRectangle( dsp, starPix, pixGC, 0, 0, 300, 300 );
   XSetForeground( dsp, pixGC, 1 );
   for ( i = 0; i < NUMSTARS; i++ )
   {
      stars[i].y += stars[i].vel;
      if ( stars[i].y >= 300 )
      {
        stars[i].y -= 300;
        stars[i].x = (int)(300.0 * drand48());
      }
      if ( stars[i].size == SMALL )
        XDrawPoint( dsp, starPix, pixGC, stars[i].x, stars[i].y );
      else
        XFillArc( dsp, starPix, pixGC, stars[i].x, stars[i].y,
                    3, 3, 0, 360*64 );
   }
After clearing the Pixmap, I reset the GC foreground to 1, so I can
draw my stars. Note that when drawing into Bitmaps, you should
not use the BlackPixel() or WhitePixel()
macros to set your foreground. On some systems, BlackPixel()
returns a zero, and on others, a one. Therefore you should always
draw using raw 0's and 1's when using Bitmaps.
For each star, I add that star's velocity to its current y-coordinate. If this takes the star off the bottom of the Window, I pop it back up at the top again, at a new random x-location. The size of the star determines whether I use XDrawPoint() or XFillArc() to draw it.
To copy the Pixmap into our Window, we use the intimidating, eleven-parameter XCopyPlane() function. In our case, the call is fairly easy, since we're copying our entire Pixmap into a Window of the exact same size. We set our Window GC foreground to be white and the GC background to be black, so that our Bitmap is copied into the Window with our desired colors.
   XSetForeground( dsp, winGC, WhitePixel(dsp,scr) );
   XSetBackground( dsp, winGC, BlackPixel(dsp,scr) );
   XCopyPlane( dsp, starPix, win, winGC, 0, 0, 300, 300, 0, 0, 1 );
   while ( 1 )
   {
      while ( XPending(dsp) > 0 )
      {
         XEvent ev;
         XNextEvent( dsp, &ev );    // guaranteed NOT to block
         ...
      }

      // if we get here, there are no events to process;
      // so perform the real-time update-screen stuff now
      ...
   }
Looking at the code, some people might not like the idea of processing
all events on the queue before proceeding with the real-time
stuff. They argue that if there are "a bunch" of events on the queue,
then the real-time section of code won't get executed in a timely
fashion. They would rather only process one event per iteration,
rather than all of them. I can appreciate the logic behind this
mentality, and in our program either method would probably work
equally well. However, if one were processing MotionEvents (where
the event queues can build up rather quickly), you would not want to
use this "one event per iteration" method, as the user might experience
motion-lag as the code attempts to juggle between processing the
motion events singularly and updating the screen.
When shown in rapid succession, the bitmaps give the illusion of a
pulsating sparkling ball of energy. (Okay, I'm reaching a bit.
Work with me here  ).
Each torpedo has an (x,y) coordinate,
and a sparkle-toggle flag to determine which bitmap state we are in.
).
Each torpedo has an (x,y) coordinate,
and a sparkle-toggle flag to determine which bitmap state we are in.
#define  MAXTORPS  5
struct  TORP  {
   int  x, y, flag;
} torp[MAXTORPS];
When the left mouse button is pressed, I check to see if there are
less than five torpedos present. If so, a new torpedo is added to
the "active" list. I use a simple test to determine which torpedos
in the list are active. If the y-coordinate is greater than
zero, it's active and visible; otherwise, it's free to use. My
torpedoes move at five pixels per iteration, but move up
the screen; when their y-coordinate becomes zero or less, it
is automatically taken off the active list and no longer shown.
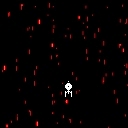
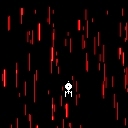
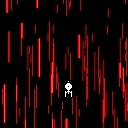
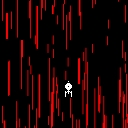
I decided that when engaging the warp drive, all the stars should start their streaking for ten frames of animation. The "small" stars streak as thin lines, but "large" stars streak as filled rectangles. Once ten frames of animated streaking has occured, I start moving the actual streaks in the same way as I moved the stars during non-warp. When coming out of warp drive, the stars reverse their streaking until they return to their original form. This whole "streaking" effect is a lot easier to grasp by seeing it rather than my poor attempt at a written explanation. The five images below are snapshots of the window just as the ship is entering warp drive, to give you an idea of what I'm talking about.

A lot of code had to be added to implement this warp effect, but the final result was worth the effort.
If you like, you can download the code for the entire program, which includes the photon torpedos and "warp speed" functionality.
written by Kevin L. Suffecool, copyright 1996